
Construction cost estimating is the process of working out what a project is likely to cost before the work begins. It helps builders, contractors, and clients plan ahead, avoid missed items, and build a realistic budget. In simple terms, it turns drawings, scope, and site information into numbers that can actually guide a project.
That is why a step-by-step approach matters. When the construction cost estimating process follows a clear order, it becomes easier to measure the work, price it properly, and check it before finalizing. This beginner construction estimating guide is designed to make that process easier to follow. If you want to know how to estimate construction costs step by step, the goal is not just to find a number. It is to build a number you can trust. A strong contractor estimating workflow also supports better budget forecasting and makes the full construction budget preparation guide much more practical from the start.
Before you begin pricing anything, make sure the basic project information is complete. A strong construction cost estimating process always starts with the right estimating inputs. If key details are missing at this stage, the rest of the estimate can become slow, confusing, and inaccurate. This is why construction cost planning before tender matters so much.
Clear information also supports better scope definition, smoother contractor estimating workflow, and early risk identification. In simple words, you cannot build a reliable number from unclear plans or missing facts. This step gives you a practical construction pricing checklist so you can move into measurement and pricing with more confidence.
Before preparing your numbers, collect the main cost planning inputs that shape the job. These estimating documents help you understand what is being built, how it should be priced, and where cost risk may appear. For anyone following a beginner construction estimating guide, this is one of the most important early steps.
When these details are clear, the estimate becomes easier to build and easier to trust. Good information upfront reduces guesswork, improves accuracy, and gives you a stronger base for every step that follows.
Before you measure quantities or apply rates, you need to define the project scope clearly. This step sets the pricing boundaries for the whole job. In simple terms, it tells you what you are estimating, what standard you are pricing to, and where the estimate begins and ends. That is a key part of construction cost planning before tender.
A good scope of work estimate also improves your project cost breakdown and makes estimate review and validation much easier later. It should cover the project type, required finishes, expected quality level, and any estimate assumptions that may affect cost. Whether you are following a residential construction cost estimate process or larger commercial construction estimating steps, a clear scope definition keeps the estimate realistic and easier to control.
This subsection helps prevent the gaps that often make estimates fail. You need to be clear about what is priced now, what sits outside the estimate, and what is still provisional. When estimate inclusions and estimate exclusions are written down properly, there is less confusion, fewer disputes, and a stronger base for tender pricing strategy.
Pricing assumptions matter just as much. If some details are missing, you should state what you assumed for materials, finishes, access, or timing. This improves construction estimate accuracy because the reader can see how the number was built. It also supports better risk identification and keeps the construction cost estimating process more honest, practical, and easier to defend.
Once you define the scope, the next step is to organize the job into clear estimate categories. This makes the work easier to measure, price, and review. A strong project cost breakdown helps you see the full job in smaller parts, so fewer items get missed, and the numbers stay easier to manage.
This is where a simple building cost breakdown method becomes useful. Instead of pricing the whole project as one big figure, you divide it into estimated categories that match the real contractor cost estimation workflow. That gives your construction cost breakdown more structure, improves checking, and supports a smoother work breakdown structure from start to finish.
After you define the scope and break the project into cost categories, the next step is to measure the work properly. A quantity takeoff is the part of the construction quantity takeoff process where you count items, measure lengths, calculate areas, and work out volumes. At this stage, you are not pricing anything yet. You are simply measuring what the job requires.
This step matters because every later cost depends on these numbers. If the measurements are wrong, the estimate will be wrong too. A careful quantity takeoff guide helps create a reliable bill of quantities, supports estimate review and validation, and plays a big role in construction estimate accuracy improvement. In simple terms, good pricing starts with good measurement.
Many estimating mistakes begin in the takeoff stage, especially when the work is rushed or key details are overlooked. The goal here is not just to measure quickly, but to measure carefully. A few small quantity errors can spread through the estimate and cause bigger cost problems later.
A good takeoff is careful, methodical, and easy to follow later. When your measurements are clear and complete, the rest of the estimate becomes much easier to build, review, and trust.
Once your quantities are ready, the next step is to turn them into direct construction costs. This is the part of the estimate where measured work becomes real numbers. You price the materials needed, the labor required to install them, and the equipment or plant needed to complete the work safely and efficiently.
This step matters because direct construction costs usually form the largest share of the estimate. A solid labour and material cost calculation helps you build a realistic material cost estimate, labor cost estimate, and equipment pricing structure. It also keeps the process practical, because supply and install cost estimating and estimating construction labour productivity are all connected at this stage.
The best way to price direct costs is to follow a simple order. Start with current rates, then check how the work will actually be delivered on site. This gives you a more realistic view of cost instead of relying on rough assumptions. Strong cost estimating methods for builders always look at both price and production.
When these parts are priced together, the estimate becomes much more reliable. Instead of guessing, you are building direct construction costs from real rates, real output, and real site conditions.
Once direct costs are in place, the estimate is still not complete. You now need to add the commercial and indirect pricing layers that sit around the physical work. This includes subcontractor costs, preliminary pricing, contractor overhead, profit markup, and a contingency estimate. These items are part of a real contractor cost estimation workflow, even though they are often less visible than labor or materials.
This step is important because many estimates look strong at first, but fail when the business-side costs are missing. A proper subcontractor pricing comparison, careful overhead and preliminaries pricing, a sensible profit margin strategy, and clear contingency allowance planning all help create a more realistic final number. Good overhead and profit calculation in construction should never be treated as an afterthought.
A lot of beginners build the estimate around direct work only. They price what they can see and measure, then assume the rest will somehow fit inside the total. That is where pricing gaps begin. The hidden construction costs are usually not dramatic on their own, but together they can create a serious shortfall.
When these items are added properly, the estimate becomes much more reliable and much easier to defend. This is also where construction estimate accuracy improvement really shows, because the price starts to reflect not just the work itself, but the full cost of delivering it well.
Before you use the number as a budget or final price, take time to review the construction estimate details carefully. This step is where small errors get caught before they become expensive problems. A proper estimate review and validation process checks whether the scope, rates, assumptions, and totals still make sense when looked at as one complete job.
This is also where cost benchmarking becomes useful. You can compare your estimate against similar projects, past jobs, or expected market ranges to see if anything looks too high or too low. Good cost control methods and budget forecasting depend on this stage. In simple terms, construction estimate accuracy improvement often happens during the final check, not during the first draft. Strong cost estimating methods for builders always include estimate validation before the price is released.

A final review framework helps you stay consistent and avoid rushed decisions. At this stage, you are not rebuilding the estimate from scratch. You are checking whether each major part has been included properly and whether the final number is realistic. This makes the review process easier to follow and easier to repeat on future jobs.
Once your numbers are checked, the next step is to present them in a format that people can actually use. A final construction estimate should do more than show a total. It should help with planning, approval, pricing, or bid preparation, depending on who will read it and what decision needs to be made.
This is where construction cost planning before tender becomes practical. The same estimate may be used as an internal cost tool, a client-facing project budget, or a formal tender price. Each version serves a different purpose, so the layout, detail, and wording should match that purpose. A good construction budget preparation guide always makes the numbers clear, useful, and easy to defend.
When this step is done well, the estimate becomes more than a spreadsheet total. It becomes a practical tool for decision-making. That is what makes the final number useful, whether it is being reviewed inside the business, presented to a client, or submitted as a tender price.
A practical example helps the full estimating process make sense. Instead of talking only in theory, it shows how scope, quantity takeoff, direct costs, indirect costs, and final review come together in one job. For this section, use a small residential estimate example so readers can see how the numbers are built step by step.
This kind of sample construction estimate does not need to be complex. It just needs to be clear. A simple project cost breakdown helps readers understand how material cost analysis, labour cost calculation, and contingency allowance planning fit into a real residential construction cost estimate process. It turns the building cost breakdown method into something useful, not just something technical.
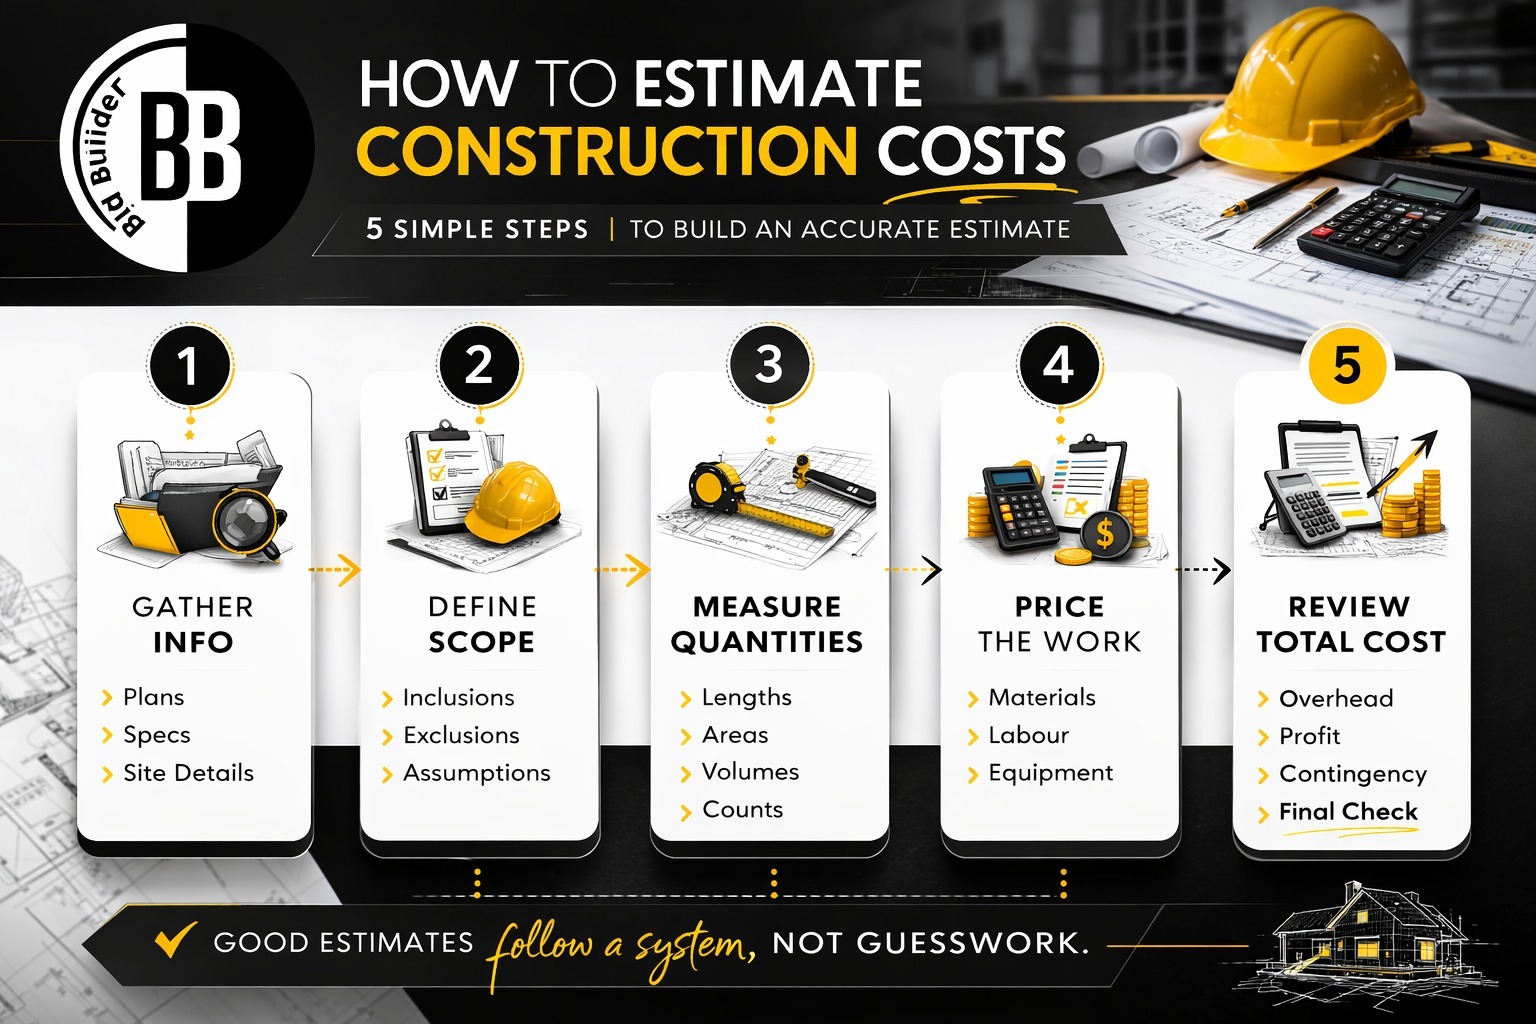
To estimate construction costs step by step, you start by gathering project information, defining the scope of work, and breaking the job into cost categories. After that, you perform a quantity takeoff, calculate direct costs like materials, labor, and equipment, then add subcontractor costs, overhead, profit, and contingency. The final step is to review the estimate and turn it into a usable budget or tender price.
The first step in estimating construction costs is collecting the right project information before you price anything. This usually includes drawings, specifications, site details, timelines, supplier prices, and labor rates. If these details are incomplete, the estimate is much more likely to miss costs or rely on weak assumptions.
Scope definition is important in a construction estimate because it sets the boundaries of what is included, excluded, and assumed. When the scope is clear, the estimate becomes easier to measure, price, review, and explain. When the scope is vague, even a detailed estimate can still be wrong because people may be pricing different things without realizing it.
A quantity takeoff in construction estimating is the process of measuring the work required before pricing it. This includes counting items, measuring lengths, calculating areas, and working out volumes. A quantity takeoff is about measurement only. It creates the base numbers that are later used to build the cost estimate.
You calculate direct construction costs by applying rates to the quantities measured during the takeoff. This includes material cost analysis, labour cost calculation, and equipment pricing. In simple terms, you work out what materials are needed, how much labor is required to install them, and what tools or plant are needed to complete the work.
A good estimate is not built from guesswork. It follows a clear system. You gather the right information, define the scope, measure the work, price the direct costs, add subcontractor and business costs, allow for risk, and then carry out proper estimate review and validation before finalizing the number. That is the real construction cost estimating process.
If you want to know how to estimate construction costs step by step, the answer is simple: follow the process in order and do not skip the checks. A strong contractor estimating workflow leads to a more accurate building estimate, better decision-making, and fewer surprises later. In the end, construction estimate accuracy improvement comes from using a full construction estimating method, not from rushing to the final figure.